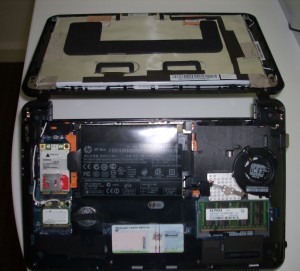
This post covers getting a EU850D 3G Mini PCIE card working with a HP Mini 210 running Windows 7 Starter and Virgin Mobile Broadband in Australia. These instructions will almost definitely void your warranty and may make your device(s) unusable, so use at your own risk!
Unlocking the HP Mini 210 allowing any PCIE card to work
- Download the latest version of your BIOS firmware from the HP website.
- Download and install HxD a freeware in memory HEX editor.
- Download and install EZH20 Bios Editor.
- Download and install 7-zip (allows unzipping of firmware update installer package).
- Follow these instructions by GKK adapted from IceLord’s hack for the HP Mini 311.
- Be careful when saving your new image. The first time I saved my image it made a copy in the installer image file folder rather than replacing the installer folder image.
Ordering and installing the Novatel Wireless EU850D Mini PCIE Card
- Order a EU850D, I got mine from Mobilx in Hungary as suggested by jkkmobile, and it took 4 days to get to Australia at a cost of $135AUD.
- The integrated SIM slot is a key feature as the Australian does not have a SIM socket soldered in (just a blank space filled with foam).
- This card is Tri-band HSDPA/UMTS – 850/1900/2100 MHz and Quad-band EDGE/GPRS – 850/900/1800/1900 MHz so it should work in most places.
- Once your card has arrived remove the access cover from your HP Mini by removing the battery and pressing the two orange ‘buttons’ whilst gently prying the cover up from the battery end.
- Unscrew the screw from the empty mini PCIE slot.
- Carefully install the EU850D and replace the screw to hold the card in position.
- Remove the black/secondary antenna from the half height WiFi PCIE card.
- Remove heat shrink holding the two wifi antennas together until the second antenna reaches the primary antenna connector on the EU850D.
- Attach the secondary WiFi antenna to the primary antenna connector on the EU850D.
- The secondary WiFi antenna gave me 2-3x the reception of one of those cheap ebay ‘U’ 3G antennas.
- Tidy the antenna cables so that they will not stop the cover from going back on and are not bent sharply or folded.
- Insert your sim card in the EU850D (note that it goes in backwards compared to most mobile phones).
- Replace the cover by slotting it in at the front and then gently pushing it back down towards the batter end.
- Download the driver for the EU850D. I used the ‘MobiLink
Connection Manager & Driver Installer‘ driver for the XU870 from the Novatel website. - Unzip the download and run the installer.
- Done, running the connection manager should show the card as detected.
Making it work with Virgin Mobile Broadband
- Open the MobiLink connection manager.
- Click the menu button in the top right corner of the manger and select ‘Profile Manager’ in the drop down list.
- Click ‘New’ to create a new connection for Virgin Broadband.
- Name the profile ‘Virgin Mobile‘, use ‘VirginBroadband‘ in the APN field and make sure ‘IP‘ is selected for the PDP setting.
- Click Next and then finish when prompted for login details as you don’t need to enter any.
- In the Profile Manager window again select the newly created ‘Virgin Mobile’ profile and click ‘Edit’.
- In the ‘Connection Info’ section, change the authentication type to ‘PAP‘ leaving the username and password fields blank.
- Click OK, and then OK again to close the profile manager.
- You should now be able to connect when you press ‘connect’ and also when you connect from the windows 7 connection manager.
Thanks to all the people on the web who have posted about getting 3G working on their blogs and forums!
