Author Archives: admin

Easily reply to your google form responses

 Inserting 'Reply' link formula

Google Docs lets you really easily create web forms, which are great for surveys, site feedback and more (and importantly free). However responding to submitted forms can be a little more difficult as your data just ends up in a big spreadsheet.

Luckily you can use a spreadsheet formula to easily create a ‘Reply’ email link for each submitted form using these steps:

  1. Create a google form. Make sure that you create a field on your form to collect an email address.
  2. Open your forms spreadsheet and select the very top cell of an empty column to place the ‘Reply’ links in.
  3. Insert =HYPERLINK(“mailto:”&TRIM(B1),”Reply”) into the cell (bold text only) replacing the text ‘B1’ with the top cell of the column that contains the email addresses from your form.
  4. Click the letter at the top of the column to select all of that column’s cells and press CTRL + D to fill the formula down to all the cells.
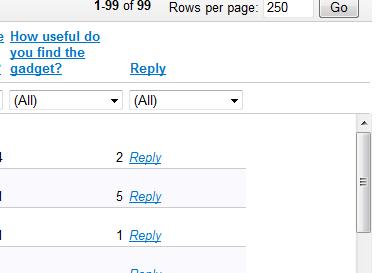
  5. Go to the view menu and select ‘List View’ to make the links easily clickable.


Unfortunately you cannot automatically populate the subject and body of the email. Whilst google spreadsheet supports ‘mailto:’ urls it doesn’t support the ‘?subject=’ and ‘&body=’ extensions.

Reply links for google form responses in list view

Interactive Christmas Display

Interactive Christmas Display

This year for Christmas I made an ‘Interactive’ Christmas Display. It is a simple JavaScript web page that lets you select and place animated gif’s on the page. We projected it on the wall as virtual Christmas decorations at the office. Passersby are free to add new images to the scene as they please.

You can try it out or use it in your office:

  1. Go to robotification.com/InteractiveChristmas.
  2. Move your mouse to the top of the page to see the menu.
  3. Click on an image to select it.
  4. Then click on the page to place the image.

Merry Christmas!

Web Screen Saver

WebScreenSaver displays web pages in full screen as your screen saver on multiple monitors (download at bottom). It has the following features:

  • Interactive mode.Settings Screen
    • Pressing the escape key allows you to interact (scroll & click links) with
      the displayed web pages. Interactive mode will turn of again after 5
      minutes of inactivity or you can press escape again to re-enable it
      (eg. When you want to leave the screen saver).
  • Support for unlimited monitors (in theory)
  • Fading every 5 minutes.
     

    • Every 5 minutes the screen fades to white for a few seconds to help prevent screen burn in (which apparently effects LCD monitors as well as old CRT ones).
  • can specify a URL on the internet or your local machine for each monitor

Anyone downloading the screen saver should note:

  • The
    screen saver cannot be used for the domain/login screen, due to the
    fact that accessing the internet requires you to be logged in.
  • The screen saver is for Windows.
  • If you use this with more than four monitors I would love to see a photo ( email it to contact@robotification.com).

Download (Source and ready to use .scr)

WebScreenSaver.zip

Please note: You will need to have the .NET framework installed for this to work.

This screen saver is something I had wanted to make for a while, I
thought it would be a great way to unobtrusively keep an eye on google
news or server up/down status. Making the screen saver was a great learning experience for me as I mainly code ASP.NET, so I got to play with Windows Presentation Foundation for the first time. I found that WPF databinding isn’t quite as easy as in ASP.NET but on the plus side it does force you to create proper view objects. Also some of the animation features in WPF don’t work quite so well for the whole screen (fading is a little jerky).

Feel free to use and adapt the code for your needs (personal or commercial).

Get a Logitech QuickCam Orbit / Sphere MP working with Windows Server 2008

Logitech doesn’t support Windows Server editions which is a pain if you are using Windows Server on your workstation or want to setup a web cam server.

Luckily I have been able to get my QuickCam Sphere working with the qc1100 version of the driver (I believe this may also work with the QuickCam Pro 9000). Unfortunately I doubt that this version will work for 64-bit machines (I was working with 32-bit).

Here is a zip (52MB) of this version as you can’t download it from Logitech anymore.

Here are the steps I followed to get it to work:

  1. Unplug your QuickCam Orbit/Sphere.
  2. Remove all existing copies of Logitech QuickCam drivers and software.
    1. Go into the control panel and open ‘Programs and Features’.
    2. Then select each program with ‘Logitech’ in the name and click ‘uninstall’.
  3. Restart your computer.
  4. Download the ‘qc1100’ version of the driver and software which works with server 2008 using the zip link above.
  5. Extract the zip to your desktop, you should get a file ‘qc1100_server2008.exe’ and a folder called ‘Bin’.
    1. The exe is the one I downloaded from Logitech some time ago.
    2. The Bin folder is extracted from the installer so you don’t have to.
    3. FYI: To extract a zip file in windows right click the file and select ‘extract all’ then follow the prompts.
  6. Double Click the ‘qc1100_server2008.exe’ installer.
  7. Make sure you de-select ‘get latest version’ otherwise it will download the latest version of the driver software which does not work.
  8. Continue through the installer as normal.
  9. When the installer finishes Restart (if the installer doesn’t ask you to I suggest you do anyway).
  10. Now plug in your QuickCam.
  11. All being well Windows should recognise your camera and install it.
  12. Check to see if your Camera is working. If it does, great you are finished! If not read on as I had to do these extra steps:
    1. Unplug your QuickCam again.
    2. Restart your computer.
    3. Open the ‘Bin’ folder from the zip file (or extract it yourself from the installer exe).
    4. Then run the driver only installer ‘setup.exe’ in the ‘Bin’ folder.
    5. Then plug your camera in again. This time it should install and start working.


I hope this gets your web cam working too!


A Simple Javascript Namespace Manager

Chris Pietschmann has a great article on a simple namespace manager. He states that if your using an AJAX framework you should obviously use the namespace management that it provides. However his code is perfect for my situation where I don’t have my AJAX framework loaded yet but do need my namespaces defined.

Anyway the reason for the post is that I refactored Chris’s code into a smaller recursive function:


/// Create the Namespace Manager that we'll use
///to make creating namespaces a little easier.
if (typeof Namespace == 'undefined') var Namespace = {};
if (!Namespace.Manager) Namespace.Manager = {};

Namespace.Manager = {
Register: function(ns) {
if (ns.length > 0) {
myBaseNs = ns.substring(0, ns.lastIndexOf('.'));
this.Register(myBaseNs);
eval("if(!window." + ns + ") window." + ns + " ={};");
}
}
};

Compress all javascript files in a folder


I was looking into compressing JavaScript files and came across this JavaScript compressor by Dean Edwards. On the site he offers a .NET port by Jesse Hansen, which I have just ‘hacked’ to recursively duplicate a directory with the .js files compressed. I say ‘hacked’ as it was a bit of a rush job, but it seems to work. It also lets you put in a ‘header’ which allows you to put an author/copyright notice at the top of each of the compressed files. The dupicate folder is created in the same location as the orginal and named the same as the original with ‘_packed’ appended.


The original code is covered by a ‘GNU LGPL’ licence, so I’m posting my modifications here for anyone who might need or want them. I made my changes in Visual Studio 2008 so if you want to open the project you will need a copy (the free/express version should work fine). You will also need the .NET framework installed, I think the installer will prompt you to download it if you don’t already have it installed.


Download (source & installer): DirectoryPacker2.net.zip


Virgin Mobile Gadget Status

This post is for all the users of my Virgin Mobile Gadget to explain why it is not working and I have not put out an update.

Firstly, I have been flat out since I have moved to Adelaide, working and studying engineering is taking up almost all of my time. Secondly, Virgin has changed the html on their website; such that it is no longer practical to use Regular Expressions to extract data from the web pages as it does currently, (I have tried with no success).

However, there is still hope, I have replied to a few people saying that I am working on a new version and this is still the case, it is just taking longer than expected.

This is mainly because I have designed a completely new architecture for the gadget, which unfortunately means it needs to be mostly re-written. It will however have the following benefits:

  • It is using the jquery library, which speeds up development (when I get a chance to do it).
  • Data retrieval code can be updated more easily.
  • The gadget will update itself automatically with no need to re-install.
  • Support for other services here and overseas can be added (e.g. Telstra, Virgin USA).
  • Google will be supported through an iGoogle Gadget which works with both iGoogle Hompages and the Google Desktop Sidebar.